Sunday 26 December 2010

Daring Bakers' Challenge - December 2010: Stollen

Christmas has just gone by, but I still have one Christmas-y thing to do - post my DB Christmas challenge.
 
I only used a quarter of the recipe given by our host, then made two small Stollens.

Blog-checking lines: The 2010 December Daring Bakers' challenge was hosted by Penny of Sweet Sadie's Baking. She chose to challenge Daring Bakers' to make Stollen. She adapted a friend's family recipe and combined it with information from friends, techniques from Peter Reinhart's book.........and Martha Stewart's demonstration.

Stollen shaped like a wreath using kitchen scissors to form the segments as written in the challenge recipe.

Stollen is a German Christmas bread that contains dried fruits, citrus peels, nuts, and sometimes marzipan, and heavily dusted with powdered sugar. It is similar to fruit cake except it's a fruit bread. This was my first encounter with the Christmas Stollen, so I was really happy I was able to participate this month's challenge despite the busy season. Once I got my dough done, that's when I got excited for the Stollen. The aroma alone of the dough makes you want to eat it. Unfortunately, I had to be patient proofing the dough; all the waiting was definitely worth it.

My version of making a wreath shaped Stollen; I made tiny balls then arranged them alongside each other to form a circle.

I quickly took a bite as soon as I finished snapping some photos. Honestly, I wasn't so impressed at first bite, so I thought maybe if I left it to cool down then eat it the next day instead. Alas, my hunch was right. Stollen is one of those desserts better eaten when it has time to cool down. It goes so well with a hot cup of coffee. It does have a similar taste with fruit cake, but in a bread-like texture.

A photo of the inside of my Stollen; I don't think the yeast worked it's magic as it should have been fluffier.

On a different note, I'm still on my Christmas / New Year getaway in the 'land down under'. I'm really having a blast here with my family. I have many things to share with you guys, so I will definitely be blogging about my trip once I get back.

So how did you spend your Christmas? I hope you all had a very merry one!

Bisou bisou,
Charlotte

Sunday 19 December 2010

Mum-in-Law's Fruitcake

My H has been yearning for his mum's fruitcake this Christmas. I offered to make him my version of fruitcake, but he wants his mum's. So what else can I do, but ask my mum-in-law for the recipe.

When I got the recipe, I became excited to make it. Why? Mainly because it doesn't use butter; all the fruitcake recipes I encountered in the past so far has a butter cake base. Another reason is her recipe uses tea to soak the dried fruits. A completely different and new fruitcake recipe I was really looking forward to make.


Result: success! My H was so glad to have his mum's fruitcake again. Sometimes with food, regardless of how a dish was made or what kinds of ingredients or techniques were used, it's what you are used to from your childhood that would always do the trick.


The fruitcake was quite addictive I must say. The texture has a bit of a soft bite and is a little chewy. The cake has a distinct taste of nutmeg, and the fruits didn't overpower the flavour of the entire cake. As for using the tea for soaking, well I didn't really taste the tea on the actual cake, but I guess it contributed to the taste of the finished cake. I'm not a fan of fruitcakes at all, in fact I was once anti-fruitcake, but this is one that I can actually enjoy eating. So far, with all the fruitcakes I have tried in my existence, this is probably just the fourth one I liked. I'm really happy to have inherited my mum-in-law's fruitcake recipe.

Speaking of family, I will be spending my holidays in sunny Australia with my family. I'm really excited to see them, and I'm also thrilled to be experiencing Australian and Modern Australian cuisine!

Happy Holidays Everyone!

Bisou bisou,
Charlotte

Thursday 16 December 2010

Almond Biscotti

 
I love sharing what I bake with people. So whenever there is a special occasion like Christmas, I definitely have the urge to make special treats to give away. This year I decided to make almond biscotti (recipe from Joy of Baking). Biscotti, which means twice baked, are classic Italian cookies that are dry and crunchy in texture, perfect to accompany a nice cup of coffee.


I gave these lovely cookies to my H's colleagues, and they were really delighted. There's nothing better than spending the Christmas season through sharing and giving!

Bisou bisou,
Charlotte


Thursday 9 December 2010

Follow Me on Twitter

So I've decided to enter the world of twitter... I wanted to have a more casual extension of my blog; at times I often have spur-of-the-moment food related thoughts or encounters that I wouldn't necessarily blog about, so twitter is my outlet for those tidbits.


So to my dearest readers, follow me on twitter - http://twitter.com/ambitiousbubble. See you there, tweet tweet tweet!

Bisou bisou,
Charlotte

Tuesday 7 December 2010

Spirit of Christmas

The sound of Christmas songs, bald trees encrusted with dazzling lights at night, shops packed with people buying Christmas presents, Christmas themed shop windows... it's this time of the year again! 


What is it that makes you feel the festivities? For me, there's five things: Christmas gifts shopping, setting up the Christmas tree, Christmas songs, Noche Buena (Christmas Eve feast) and baking something Christmasy. Last Christmas season, I made my first gingerbread house, and I also made some gingerbread bells to give away to my H's colleagues. I can't believe that was already a year ago! 


I'm done with my Christmas shopping, our Christmas tree has been set up and definitely been listening to Christmas songs. So there's two more things on my list to make my Christmas complete!

Bisou bisou,
Charlotte

Thursday 2 December 2010

Louis Vuitton City Guide

Do you use travel guides when you visit a new city? Why not travel in style with the Louis Vuitton City Guide? LV has been publishing their own city guides since 1999. Their city guides covers numerous cities from Mumbai to New York to Tokyo to Thessaloniki; there are bountiful cities to explore with LV.
photo from Louis Vuitton website

I've been reading reviews about the Louis Vuitton City Guides, and so far all write-ups were fabulous! What got me sold for the LV City Guides is this mouth-watering clip:

English Version


French Version


"Je ne comprends pas le français, mais j'aime écouter c'est beau son!" (google translate) I don't understand French, but I love listening to it's beautiful sound!

Yes, Paris! I have loads of dream destinations, but Paris is at the top of my list. Not only is it very rich in culture, but oh... the pastries! I could spend all day nibbling in patisserie after patisserie, heaven!

photo from Louis Vuitton website

Though I have no plans on visiting Paris YET in the near future, I think I would be investing on a Louis Vuitton City Guide Paris 2011 edition. No harm in doing some advance research!

Bisou bisou,
Charlotte

Friday 26 November 2010

Daring Bakers' Challenge - November 2010: Crostata

A little update before blogging about my DB challenge: My left hand is still recovering from the burn; it means my hand is still bandaged although not as bad as the picture in my previous post. I now have four of my fingers out of the bandage, and the bandage just goes up to my wrist instead of my arm. I still can't use my left hand normally though because my thumb is positioned in a certain way by the bandage therefore not allowing it to move. Good news is the doctor is happy with the progress of my burn, so pretty soon, I shall be back in the kitchen baking more sweets!


In the meantime, I had my H acting as my sous chef for this challenge. At first I decided to miss out on this month's challenge, but the thought of pastry cream tart alone made me salivate, so I kept on pondering how I could make it happen. Good thing my H volunteered to be my second hand, although I did have some hesitations because my H and I don't work so well in the kitchen arena. His quirks and my quirks don't mesh well in cooking/baking. I'm quite strict, focused and theoretical, while he's more easygoing and experimental. Anyway, despite all that, we gave it a go; everything worked perfectly. He was a good support; he wanted me to make most of this challenge myself, so he was just quietly watching me bake and assist on things he knows I cannot do with one hand i.e. slicing the butter into cubes, scraping the dough that has been stuck on my hand and putting in/taking out the crostata from the oven... oh, and the dishes!


Blog-checking lines: The 2010 November Daring Bakers' challenge was hosted by Simona of briciole. She chose to challenge Daring Bakers' to make pasta frolla for a crostata. She used her own experience as a source, as well as information from Pellegrino Artusi's Science in the Kitchen and the Art of Eating Well.


Crostata is basically an Italian version of a tart, but what makes it a crostata is the use of a specific sweet pastry called pasta frolla. I've become loyal with Martha Stewart's pate brisee recipe when I'm making any sorts of pies and tarts, so to try a new kind of pastry is refreshing. I have to admit that I do kind of like the pasta frolla better than pate brisee. Just a simple reminder for me to not get stuck in my own ways; always try to explore new possibilities of using something else other than what I'm used to, so I have much to thank for from this challenge.


I've thought long and hard as to what filling I should make for my crostata. In the end, the most simple choice warmed my appetite - pastry cream filling; in Italy, this specific crostata is called crostata con la crema. The pasta frolla recipe that our host, Simona, gave us had lemon zest incorporated in the dough, but I decided to use the kiss of orange zest instead. As for my pastry cream, a very classic vanilla pastry cream. So could you just imagine an orange tang of crust topped off with a flow of incredibly creamy vanilla pastry cream? I say that's utter deliciousness!


Oh, I got some leftover pasta frolla dough as well as vanilla pastry cream, so I decided to make it into an empanada. Empanada is a semicircle pie with either savoury or sweet stuffing, which is popular in Spain and Portugal, as well as countries that has been colonized by both countries i.e. Philippines and most Latin countries. Anyway, my empanada was not stuffed but rather filled with vanilla pastry cream; an absolute treat.

Bisou bisou,
Charlotte

Friday 12 November 2010

Baking on Hold

Accidents do happen. Unfortunately second time around for my poor left hand... First time, burnt by a fireball that exploded from my gas oven; this time, hot wax got splattered around the skin between my thumb and index finger.


The bandage the hospital wrapped on me makes my burn look so tragic (it's not as bad as it looks), but I guess it would help give a speedy recovery. Until then, I have to pause my baking sessions... :(

Bisou bisou,
Charlotte

Thursday 11 November 2010

Banana-Coconut Centered Chocolate Mousse

I've been meaning to make this cake for the longest time; finally, I've got around doing it. I encountered this concoction from a chef who once worked at one of my favourite patisseries back home. Unfortunately, I managed to loose the copy of the recipe, so I had to search hard on memory lane as to what components are in the cake and give my own take on this creation. I'm not sure if I got everything on my cake, but regardless, the cake was fantastic!


The cake is composed of layers of dacquoise, coconut jelly, caramelized bananas and milk chocolate mousse; it is then coated with a nice blanket of white chocolate ganache, then decorated with chocolate panels and chocolate curls. Yes, it seems like it has so much flavours going on, but it does come together nicely. Imagine a chocolate banana smoothie on a cake, but a lot lot better!

Components used for this dessert treat:
Bisou bisou,
Charlotte

Thursday 4 November 2010

Mango Mousse Cake

Ok, so I have been carried away lately with fondant cakes, but I'm back to my, sort of, comfort zone. I was, at first, thinking of making some kind of chocolate banana mousse concoction dessert; however, as I was about to purchase the bananas I saw a glowing yellow bargain... mangoes! Mangoes here in Korea are really pricey, like around $3.50 for two pieces, and being a cheapskate, I'm not willing to pay for it. So when I saw the lovely offer on the reduced rack of the fruit section... I thought, "I've got to have it" - $1 for two pieces, a tad over riped, but perfectly sweet for the dessert I had in mind!


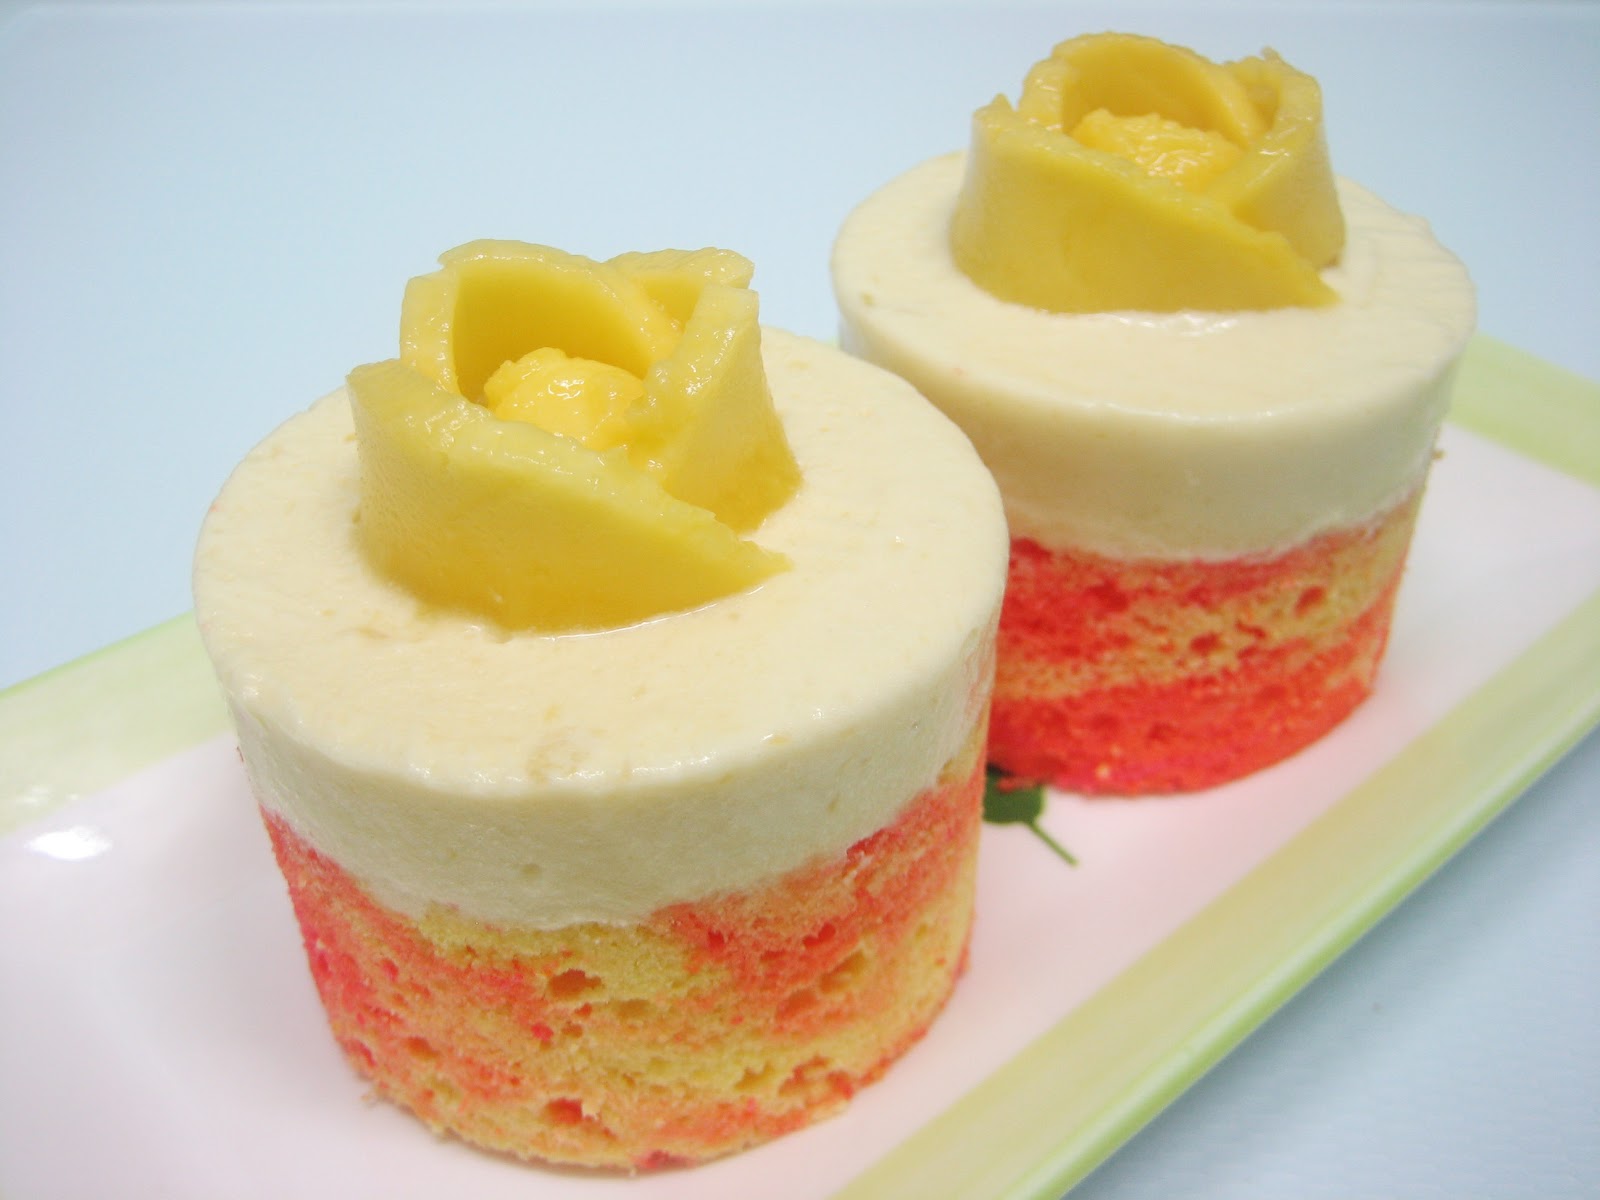
This is what I have come up with - mango mousse cake. So it's a basic mango mousse that is semi-encased with sponge cake. I had a little fun with the sponge cake by marbling some fun tropical colors that still screams 'mango' into it. For a simple finish, I just made a small flower out of sliced mangoes.


This mousse cake is really really light and refreshing; absolutely perfect to finish off a filling meal. There are two main components for this cake: the sponge cake and the mango mousse.

First, the sponge cake.
  
  1. Make a >Basic Sponge Cake Recipe<, then divide the batter into the amount of different colors you want in your cake then add food coloring in the respective batters. So in my case, three - pink, orange and yellow; note that I have more yellow than pink and orange because I wanted yellow to be the dominant color in the marbled sponge.
  2. I poured the pink, orange and yellow sponge cake batter on a stripe vertical pattern on a lined square pan. Then, I used my spatula to swirl around the batter to create the marbling effect.
  3. After baking, you would notice that the top of the sponge turns into golden brown, but don't worry. Simply use your fingers and gently rub it off, then you will see the lovely marble pattern you have created.
  4. Slice four strips from the sponge cake, this would be used to ring around the inside of your mold. Make sure to measure how thick you want your strips to be. I had mine measured two-thirds of the height of my mold. Place the sponge strips inside each mold.
  5. Cut out circles from the remaining sponge cake to serve as base of your cake. I used the sponge-lined mold to use as a guide for the size of my circle base.
  6. Now you have your sponge case ready to be filled with mousse. Cover the molds with cling, and put them in the fridge while you make your mousse. 

I used to think making mousse is the most complicated thing ever, because when you read recipes of it, it's usually very long. As I make mousse desserts more often, it occurred to me that it's actually quite simple. Like there would be different ratios or mix of ingredients in different recipes as well as different procedures, but when you come down to it, it has almost like a 'generic' way of making a mousse. You just need a lot of mise en place (having all the ingredients needed prepared and set in place) to do.

I have made a mini documentary of how I made my mango mousse, and hopefully I can translate to you how I perceive making a mousse. For me, mousse is a four part dessert: part 1 - whip yolks and sugar, part 2 - add the flavour of your choice and gelatin (if your using), part 3 - fold in the whipped egg whites and part 4 - fold in the whipped cream; et voila! It is simple when you look at it that way right?

Anyway, here's a more detailed guide. For this mango mousse, I opted not to use gelatin.

  1. Mise en place. In picture number 1 there are four bowls, clockwise from top bowl, 2 egg yolks with 34 g sugar, 2 egg whites with 15 g of sugar, 150 g mango puree and 90 ml whipping cream. Now you're ready to whip and fold, whip and fold, whip and fold!
  2. Place everything aside on room temperature except for the cream, put that in the fridge. Get the bowl with the egg yolks and sugar, and place it on top of simmering water. Whip until thick and light in color (ribbon stage).
  3. Mix in the mango puree. If you're using gelatin, this is the part where you add it in as well. Remove from simmering water. Set aside.
  4. Whip the cream, and return it back to the fridge. The reason why I whip the cream before the egg whites is because egg whites deflate faster, so I want to whip the whites as close as possible to when I will use it.
  5. Stir the egg whites with sugar on top of simmering water until the egg whites are warm to touch. Remove from simmering water.
  6. Whip the egg whites until soft peaks form.
  7. Fold a third of the egg whites into the egg yolk-mango puree mixture. The purpose of this step is to lighten the yolk mixture to give it a closer consistency to the rest of the egg whites.
  8. Fold in the rest of the egg whites. Notice I use a whisk to fold, this is just my preference; I find that it incorporates mixtures faster than using spatula. 
  9. Fold in the whipped whipping cream.
  10. Voila, mousse is ready!
 Now that the mousse has been made, it's now time to fill the sponge cakes.


Clockwise from top left picture:
  • Fill the sponge-lined molds with the mango mousse; level the mousse to the top of the mold using an offset spatula to give a smooth finish. (Try to fill the molds neatly, don't be messy like me..) Cover in cling film, and let it chill overnight or until it's set.
  • Once it's set, Take of the cling film. One by one push the bottom of the cake gently to unmold. I used the help of my rolling pin to give a flat support in pushing up my cakes.
  • Voila, the cake can be served as it is or you may add finishing touches. 

These dainty creations really made me happy. It looked good and definitely tasted good! I'm in bliss to have found those mangoes. I've never really yearned for mangoes even if it is a very common fruit from where I grew up, but I guess not having it readily available made me miss them.


I got some left over mousse, so I just filled them on a wine glass and topped it off with a flower made from the rest of the mango slices.

Components used for this dessert treat:
Bisou bisou,
Charlotte

Wednesday 27 October 2010

Daring Bakers' Challenge - October 2010: Doughnuts

I have never been comfortable with making breads at all, and this month's DB challenge got me facing my fear. Our challenge this month - doughnuts! Yes, doughnuts are delicious; one of the best comfort foods ever, but I would rather buy from a shop than make it myself because I'm not confident in the arena of any yeast product.


However, there's a reason why I joined DB. It's to push my boundaries in baking, and face making pastries, desserts or bread that I wouldn't normally do. So here I am... baker!


Blog-checking lines: The October 2010 Daring Bakers challenge was hosted by Lori of Butter Me Up. Lori chose to challenge DBers to make doughnuts. She used several sources for her recipes including Alton Brown, Nancy Silverton, Kate Neumann and Epicurious.


Since our host provided four recipes to choose from, I've decided to choose Kate Neumann's bomboloni recipe. Bomboloni is a Tuscan version of filled doughnuts, except that the filling is piped on the top of the doughnuts instead of the sides, which we normally see with filled doughnuts.

I've psyched myself for this challenge; I wasn't anxious at all when I was making the dough for the bomboloni. I was also following the recipe down to a tee. I guess even if I was mentally ready to face the doughnut challenge, I was subconsciously nervous. Hence, it showed on my doughnuts. When I bake, I normally use my instinct to see if things are going smoothly, but in this case, I was so glued in with the recipe. I didnt' trust my judgement when I saw that my yeast might not have foamed up the way it should. I just continued following the recipe.


As a result, my doughnut was a flop. I was only able to make half of what the actual yield for the recipe should produce. My doughnuts came out really dense and heavy, but the taste was still good. So I decided to still continue filling and glazing my bombolonis.


So for my bomboloni, I dusted their top with powdered sugar, then filled them with pastry cream. For the glaze, I piped alternate circles of dark chocolate and white chocolate ganache. The taste of the final bomboloni was really really good! The only down side was how heavy the actual doughnut was. I guess practice makes perfect; I would definitely be making another batch at some point. This time, I'll trust myself when I think something is not right before it becomes too late.

Bisou bisou,
Charlotte

Wednesday 20 October 2010

Fondant Cake - Chocolate Cake with Chocolate Buttercream Filling

I got a good news from my friend recently; she's going to tie the knot this December! Oh, I could see her eyes glow as she was telling me the news over coffee. I was so made up for her, so I decided to make a cake for her (she does love her sweets) to send my best wishes.


This cake is a 2 layered 5 inch chocolate butter cake with chocolate buttercream filling. For the chocolate cake itself, I made use of a third of my Lemon Cake recipe. Then to change it into chocolate cake, I substituted 28% of the amount of flour with cocoa powder, and scraped off all the lemon components in the recipe. As for the buttercream, I used a third of my Swiss Buttercream recipe, and simply added 30g of melted chocolate. You got to make sure though that the melted chocolate is not too hot that it could melt the buttercream, but at the same time not so cool that when added to the buttercream, it would just solidify into tiny clumps.


For the fondant, I used a third of my Marshmallow Fondant recipe. I actually picked out pink marshmallows for this one to give my fondant an instant light pink hue.


So another fondant project, another 'over the moon' amateur fondant cake decorator! I'm really getting so enthused with this; I'm even thinking of buying myself some playdough to practice molding! 


Components used for this dessert treat:
Bisous bisou,
Charlotte

Friday 15 October 2010

Skoda Fabia Advert - Humongous Car Cake!

I just want to share this extremely amazing car advert. I think this could be my favourite advertisement of all time. When you're feeling sad... you simply tune in to this wonderful ad, and then you won't feel so bad! Enjoy! :)


Behind the scenes.


I hope that one day I could be part of a project like this!

Bisou bisou,
Charlotte

Thursday 7 October 2010

Fondant Cake - Purple Yam Cake with Coconut Cream Filling

So I went into the realms of the artistic side of baking again... My 'July fondant cake project' has completely overwhelmed me; the satisfaction of finishing a work of art was addictive. I have been constantly gushing over my fondant cake for the past two months... I know, I know, self-praising! But hey, people who know me knows I'm very critical of myself, so self-complimenting is a rarity. So I think I have a free pass on being self-absorbed occasionally! Anyway, I've moved on. I've created my new obsession, my teacup cake project!


I have always been fascinated with teacups, or tea sets for that matter. So I took that as an inspiration for my cake. At first, I was being ambitious, and I was thinking of making a floral porcelain like teacup cake. But after some reality check, I settled on a simple casual teacup design.


As for the inspiration of the cake itself, it came from my recent trip from the Philippines. One of my favourite cakes is ube cake (purple yam cake), so when I was back home, I purchased a bottle of purple yam flavouring. The filling, I chose coconut cream filling simply because coconut compliments purple yam really well.


Now for the baking side of this post, you'll need:

  • Three inch round purple yam cake; I used a third of the Lemon Cake recipe, and took out all the lemon related ingredients, then replaced it with about 1/2 tsp purple yam flavouring.
  • Coconut cream filling; I made pastry cream, but used coconut milk instead of milk.
  • Swiss buttercream.

For a quick run through on the cake assembly (Detailed version --> 'July fondant cake project'):

  1. Put the filling in between layers of the cake. Make sure to pipe the perimeter of the cake with buttercream as a guide of the thickness of your filling, and as a protection to stop the filling oozing out of the cake.
  2. Spread the filling, and make sure it's level with the buttercream guide.
  3. Now you have your filled cakes. I suggest chilling the cake for at least 30 minutes to make the whole cake less delicate, but if you're saving time you can skip the chilling part.
  4. Carve the cake to your desired shape; in my case teacup.
  5. Coat the cake with a thin layer of buttercream; this will help keep the crumbs intact (hence, crumb coating). Chill the cake until the buttercream doesn't smudge on your fingers when touched; maybe around 30 minutes.
  6. Do the second coating of buttercream. This time thicker, and the purpose is to shape the cake as perfect as you can, so as to make a nice smooth silhouette once the fondant is draped over. Make sure to chill the cake until the buttercream is set before covering with fondant.

So cake is now done. Time to decorate! I used Marshmallow Fondant for decorating for two reasons. First, it's hard to find the ingredients to make a proper fondant here in Korea; second, I think marshmallow fondant has a nicer taste compared to a proper fondant. Decorating with fondant is almost like playing with playdough. Now I wasn't exactly good with sculpting playdough when I was a kid, so fondant cake decorating isn't exactly an easy task for me. However, I really like playing with fondant; just too bad I don't have many people to feed so I can't really attempt to make three tiers of cakes.


For now, I'm happy with making mini fondant projects. Plus, I have a long long way to go, and loads of improvement to do. I know my teacup cake is not the most polished art, but for an amateur starter, I'm happy with what I've created!


Now I have to consider if I'm going to do more fondant cakes in the near future, because if I am, I have to start thinking of investing on cake decorating tools. Trust me, I don't have any sorts of cake decorating tools in making this project as well as my first fondant cake project; I just made use of whatever I have in my tiny cozy kitchen.

Components used for this dessert treat:
Bisou bisou,
Charlotte

LinkWithin

Related Posts with Thumbnails