Monday, 27 September 2010

Mooncake...Not!

This is a delayed posting because I was on my holiday visiting family and friends in Philippines. I wanted to bake something for my family because I do miss having my family appreciating/criticizing my work! Baking in Korea is different; I only have my H to taste my baking.  At first, I thought of making a fondant cake, but I have hesitations if it would travel well. Should I or shouldn't I go for fondant cake...?


Well, I didn't. Since Mooncake festival was coming up, why not make mooncake?! This is not your ordinary mooncake; it's an apple pie mini mooncake!


Mooncake festival also known as Mid-Autumn festival is celebrated every fifteenth day of the eighth month of the lunar calendar in China, and basically all Chinese community around the globe. It is believed that this time of the year is when the moon shines at its brightess. Legend has it that in the thirteenth century, Chinese used mooncakes as a medium to hide messages to spread the plan of revolt against the Mongolian rulers. There's actually other legends behind the Mooncake festival, but I won't go into it anymore.

molded mooncakes before baking

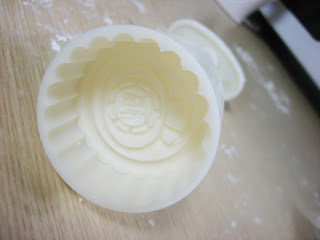
my cookie stamp mold

Mooncakes are pastries that are as big as a human palm that is filled with sweet dense fillings. Traditional fillings are lotus seed paste with salted yolk on the center, sweet black bean paste, and mixture of pickled melon and nuts. There's also another version of mooncake, which is called snow-skin mooncake. This was created around the 1980's. The snow-skin mooncake has a soft outer cover that is made from glutinous rice. There are now loads of modern versions of mooncakes from durian filled to ice cream filled, basically more choices now to choose from especially in countries like Singapore and Indonesia.


Back to my version, I used pate brisee for my pastry and apple walnut cinnamon for the filling. I don't think the pastry was the right choice though, because it didn't hold the engraving from my cookie stamp. Yes, I used cookie stamp instead of a traditional mooncake mold. I was actually optimistic to find a wooden mooncake mold here in Korea because they have a similar dessert that uses a similar mold. Indeed I found a wooden mooncake mold, but the price made my heart drop! About $90 for a wooden mold! I wasn't prepared to pay that, so I improvised with a $10 cookie stamp instead, and I was lucky to find a stamp that has the Chinese character for lucky engraved on it.  It actually worked really well, for my apple pie mini mooncake project!
filling and molding the mooncakes


I'm really happy how this project turned out. Next Mid-Autumn festival I'll try to use the traditional pastry for a mooncake, and try to hunt down a reasonable priced wooden mold!


Components used for this dessert treat:
Bisou bisou,
Charlotte

Daring Bakers' Challenge - September 2010: Decorated Sugar Cookies

Ay yay yay... Just came home from my holidays; been really busy lately that's why my blog has gone quiet for a couple of weeks, but now I'm back just in time to post my DB challenge.


 Blog-checking lines: The September 2010 Daring Bakers' challenge was hosted by Mandy of "What the Fruitcake?!" Mandy challenged everyone to make Decorated Sugar Cookies based on recipes from Peggy Porschen and The Joy of Baking.

  
The theme for the sugar cookies is 'September'; basically whatever September means to you, be it spring, autumn or back to school. For me, this year's September means friendship; my girl-friends and I are in a long distance friendship. We live in different countries (Australia, Canada, Hong Kong, Korea and Philippines) now, so having girls night out or coffee dates are close to none. One of my girls, CT, got married this September, and everyone, including me, made sure we're all complete for the special day... reunion at last!


I was actually thinking of what to bake for the girls as a little something from me. So this challenge was really handy. I gave the girls personalized cookies by piping their initials on the cookies. Piping job is not an easy task at all. I absolutely respect sugar cookie decorators because this job involves a lot of patience, creativity and precision. My first reaction when I saw this challenge was - 'easy'. I was proven completely wrong! I definitely have loads of improvement to do with my piping. Despite the nonidentical pipings, the cookies tasted fabulous. I baked some extra for personal munching!


Bisou bisou,
Charlotte

Monday, 6 September 2010

Rugelach

As I mentioned in one of my previous post, I have quite some supply of cream cheese. Well just two packs actually, but for two people it can stretch to bountiful delights. So far I was able to produce tiramisu, cheesecake, red velvet cupcakes, and hazelnut praline cream cheese ice cream. Now to consume the last remains of the cream cheese, I decided to make rugelach to give to our friends, L&M, as a little something to congratulate them for their new abode.

The word rugelach derives from the Yiddish word rugel, which means royal. Rugelach is a Jewish cookie that is shaped similar to a bite-size croissant. The cookie is made out of a cream cheese cookie dough, and filled with jam, nuts, fruits, poppy seeds, cinnamon, chocolate or raisins.

My rugelach that I filled with chocolate

I learned of this cookie way back when I was a teen. My sister J was the one who shared this delight to me. I was lucky enough that she still got the recipe, so I was able to relive the luscious taste that's been lingering on my taste memory bank for so long. Taste memory bank... umm, is there such thing? Anyway... I seemed to have this impression that the cookie had a distinct cream cheese taste, but I have remembered totally wrong. Guess my taste memory is a little rusty!

A shortbread cookie, that's what rugelach taste similar to. I think that's why my H adored it because he does love his shortbread cookies. Even if I recalled the taste of rugelach wrong, my impression of it hasn't changed. It's definitely a classic treat that anyone would have a hard time resisting to not nibble on.

Bisou bisou,
Charlotte

Tuesday, 31 August 2010

Pork Medallions with White Wine Jus, Buttered Courgettes, Caramelized Onions and Potato Puree

Once in a while I put my toque on (not literally) to cook a fancy-ish dinner, and a couple of nights ago was the night I unearthed my minute cooking skills. I've recently just finished watching the Australian franchise of Masterchef, a cooking competition for amateur cooks, and I was completely blown away by the skills and knowledge of the contestants. It indeed inspired me tremendously. Main reason why I cooked something special for dinner!


So what's on the menu, you ask? I served a wonderfully cooked Pork Medallions with White Wine Jus, Buttered Courgettes, Caramelized Onions and Potato Puree. It was absolutely faaan-tastic! So here's the lowdown of what I made:
  • Medallions - I used pork tenderloin; I made sure the meat were free from dripping moisture (this technique would allow the meat to brown while cooking); I seasoned the meat with salt and pepper; I pan fried the medallions on a rosemary and garlic infused oil; I allowed the medallions to rest before serving to let the pork juices sip right back in the meat.
  • White wine jus - I deglazed the pan I used for cooking the medallions with white wine, then I allowed the white wine to reduce; voila.
  • Buttered courgettes - I sauteed the courgettes in butter; seasoned with salt and pepper.
  • Caramelized Onions - I patiently cooked my sliced onions in olive oil on a low heat until it wilted and caramelized.
  • Potato puree - I passed my boiled potatoes through a fine sieve then mixed in warm milk and cold butter and mix until really smooth; seasoned with salt and pepper.

I gave a pat on the back to myself for this dish; I was extremely ecstatic on how it came out. I was pleased with my plating (my weak point) as well as the taste of the dish as a whole. The medallions came out really nice and tender; it still had a lovely soft blush of pink when sliced. It's just a bummer I wasn't able to take a picture of the sliced pork; H and I were so focused on eating!


'Til my next super occasional non-baking post!

Bisou bisou,
Charlotte

Monday, 30 August 2010

Sometimes you feel like a nut

Ever wonder how the nuts we all love to munch on look like before harvest, yes??? Check this post out.. such a fabulous work of art from nature! :)


Bisou bisou,
Charlotte

Thursday, 26 August 2010

Daring Bakers' Challenge - August 2010: Ice Cream Petit Fours / Baked Alaska with Brown Butter Pound Cake

It's that time of the month again... DB challenge is to be revealed! I can't believe how time just swished by so quick. Before you know it, it's December again (well, let's not exaggerate). This month's challenge gave us a choice either to make petit fours, Baked Alaska or both. I decided to go for the Baked Alaska just so I can play with some flames! Before I continue my blog, I shall post the mandatory blog checking lines for this challenge.


Blog-checking lines: The August 2010 Daring Bakers' challenge was hosted by Elisa of 17 and Baking. For the first time, The Daring Bakers partnered with Sugar High Fridays for a co-event and Elisa was the gracious hostess of both. Using the theme of beurre noisette, or browned butter, Elissa chose to challenge Daring Bakers to make a pound cake to be used in either a Baked Alaska or in Ice Cream Petit Fours. The sources for Elissa's challenge were Gourmet magazine and David Lebovitz's "The Perfect Scoop".


There's basically three main components to a Baked Alaska; ice cream atop a cake then altogether fully encased with snowy meringue. The meringue is then torched or baked until brown in color; it is sometimes served flambéed. For this challenge, the cake part of our Baked Alaska has to be the beurre noisette (brown butter) pound cake. I have no complaints in using this pound cake recipe; it was a really delectable butter cake with a subtle nutty taste from the brown butter. The taste of the cake actually reminded me of the infamous blue tinned Royal Dansk Danish butter cookies that I used to gorge indulge when I was young; it certainly brought back childhood memories! 

  
I chose hazelnut praline cream cheese as the flavour of my ice cream for simple reasons. Firstly, hazelnut praline to compliment the nutty pound cake. Then secondly, cream cheese because I have bountiful supply of it! I don't know if you have noticed, but most of my blog post for this month had some cream cheese factor. It wasn't planned or anything; I just saw a good 2-for-1 bargain on the grocery. I know two packs of cream cheese is not much, but mind you most of the time I just bake for two, so two packs of cream cheese does go a long way in my household! Lastly, the sound of hazelnut praline cream cheese does make me salivate!


I've prepared the meringue, all my components were set; the time had come to play with my torch (bought specially for this challenge)! I really really had a blast, and it definitely brought out the kid in me. All these flames gave me a fiery urge to go all daring with the glow of heat. The rum was out, and I had a tea cup filled with dazzling blaze of flambéed rum ready to be poured onto the toasted snow. I might have gone overboard though as the scarf I used for the backdrop of my picture caught some flame, so now it has an incy wincy hole. I must admit it was my favourite scarf, so I was really disappointed. I had no choice, but to look at the brighter side of things - my scarf has more meaning to it now than it had! Good self comfort?


Anyway, this was a really fun and exciting challenge. To be honest, when I first saw the challenge, I wasn't all enthused. I was like, "ice cream and cake... didn't we just do that last month?" Nevertheless, I decided to join in the fun, which I'm glad I did. The waves of fire made this challenge interesting! Looking forward to what next month's DB host has up his/her sleeves; hope it's something new!

I sprinkled some hazelnut praline powder on the crater of my Baked Alaska.


Bisou bisou,
Charlotte

Sunday, 22 August 2010

Red Velvet Cupcakes


A week ago, my H bought a 6-cup muffin pan for his Yorkshire pudding project. To our dismay, it wouldn't fit into our tiny oven! Our oven is just the size of an oven toaster. We were really disappointed, but my H decided to make a surgical operation on the pan. He sawed off two of the cups, and it was successful! It's not the most polished muffin pan, but it's usable. Here's a snapshot of it.


So to christen our newly operated pan, I decided to do a cupcake version of the classic American red velvet cake. It's a really really good comfort food, and the sweet cream cheese frosting is indeed the icing on the cake. No wonder it's a popular southern cake.


The actual cake of the red velvet cake is a mild chocolate butter cake. It is said that it got it's name from the distinct red hue attributed from the chemical reaction between the acids (distilled vinegar and buttermilk) and the cocoa found in the cake.  The acids heightens the fierceness of the red anthocyanin found in the cocoa, but nowadays it's the addition of red food coloring that gives its vibrance. Some people even use beetroot to add color. 


All in all, my H's engineering work on the muffin pan was well worth it. And the red velvet cupcakes were a nice celebratory treat to baptize the new addition to our growing pan family. 

Bisou bisou,
Charlotte

LinkWithin

Related Posts with Thumbnails